ll4D: the LXD(LXC)-LAMP environment For Development

There are plenty of tools for development, but I really wanted to take advantage of LXD for web development, so I ended up writing ll4d: the LXD(LXC)-LAMP environment For Development environment.

There are probably better ways to do this, and highly optimized juju charms to build something much better. But for my persona use case, this script is just perfect. It takes just 48 seconds to build everything and it has 100% all the functionality I need.

It is a very simple script, which works as follows:

  • Sets up a basic LXC/LXD environment
  • Creates a container with a LAMP (Linux Apache MySQL PHP) server
  • Creates a fancy symbolic link from the apache root directory at the LAMP container to somewhere in your home or desktop. This allows you to work on your code using your visual tools and view the result on the fly
  • Create a simple website to test Apache, PHP and MySQL

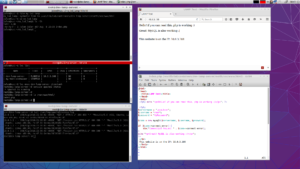
Here is an screenshot of a working environment. You work from a directory directly under your home, access the LAMP server for working with configurations and MySQL databases and access the server on at the given IP.

Screenshot of a work environment with ll4d.

Screenshot of a work environment with ll4d.

ll4d is available on my github repository: https://github.com/julenl/ll4d

The few instructions on how to download and exectute it, can be found at the README file.

I hope you find it useful… if you don’t, you can remove it completely in 3 simple steps:

./ll4d.sh –clean
rm -rf ll4d*
sudo aptitude purge lxd
 

Troubleshooting OpenStack the cool way: ini_comparer.py

If OpenStack is already complex enough, troubleshooting OpenStack issues can be a nightmare! If you agree, you might be interested on the ini_comparer script.

The source of most of the issues with OpenStack is usually on the configuration files, which have the “ini” format. This format is not particularly easy to handle by old school “sed” people like me and in addition, the standard configuration files are meant to be self-documented, which means tons of lines of comments and commented options.

Putting this together, we get huge configuration files, with very similar lines and it is a pain in the lower back to check word by word, character by character every single keyword in the file.

So, provided that we have another configuration file that works fine, we can use the ini_comparer python script to do that for us. It can work with a combination of local or remote files. For example, a file on the local machine and another one in a remote one, both files are in the local machine, or both are in remote machines. Continue reading

Logo of BOMSI

The easiest way to install OpenStack: BOMSI GUI

Installing OpenStack is quite difficult, specially for the people who is not really into basically most of IT topics. In my attempt to get started, and after searching for the easiest way to install OpenStack, I ended up writing my own automated tasks in BASH, and at some point I decided to generalice those scripts a little bit more and release them to the community.

I named the installer as BOMSI: the Bash OpenStack Multinode Scripted Installer. Descriptive and catchy, isn’t it? 🙂

BOMSI follows the official install guide at OpenStack Docs for CentOS7, and it does it in plain BASH, so it is easy to understand whatever is going on during the installation, and easily improve it. It’s GPL v2 license, so you are all very welcome to contribute on GitHub repository.

The command line API is very simple and it allows to install OpenStack on a virtual environment with just 3 commans:


git clone https://github.com/julenl/BOMSI.git
cd BOMSI/CentOS7-Kilo/
for NODE in controller compute1 network; do ./bomsi-iso.sh -n=$NODE; done

… and that’s it. In some 15 minutes a horizon dashboard will be waiting for you at http://10.0.0.11/dashboard.

For generating the 3 node virtual environment it is recommended that have 8 or 16 Gb of RAM, a i5 or i7 processor (or equivalent) and some 20 Gb of free space on the hard disk, to host the KVM virtual machines. Ideally the computer should be running Ubuntu, but it should work somehow in other GNU/Linux distributions.

Furthermore, being aware that some people prefer graphical user interfaces (GUIs) to work on the configuration files and execute the options, I also added a very simple GUI.

This GUI can be run the same as the API, but with even less letters on the command line:

git clone https://github.com/julenl/BOMSI.git
cd BOMSI/CentOS7-Kilo/
./bomsi_gui.py

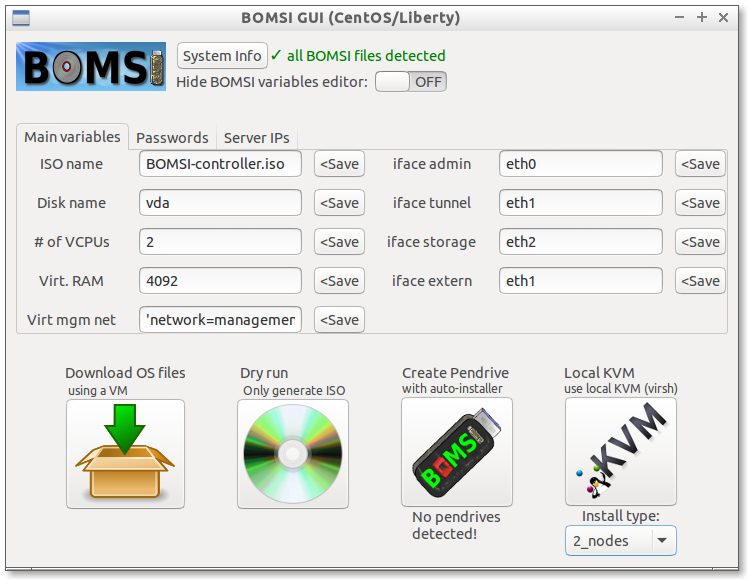
And you’ll get this:

Graphical User Interface for installing OpenStack with BOMSI

If you are OK with the default options, just click on the “Local KVM” square button and wait for some 15 minutes. That’s it.

Additional features of BOMSI:

  • Generate a fully automated multiboot ISO file, which can be burned onto a CD or provisioned via PXE
  • Install this ISO file into a pen-drive
  • Install a temporal CentOS machine with kickstart. This machine can be used to download all necessary packages to allow full offline installations

So… 3 commands, or 3 commands and a click, isn’t this the easiest way to install OpenStack at the moment?

Parsing OpenStack config files with susti

In this post I introduce my “susti” python script for easily parsing options in the “.ini” config files of OpenStack in an easy and elegant way.

Since I started working with OpenStack about one year ago, I found that the configuration files of all components have that terrible Windows-like syntax called “ini”, which I personally strongly dislike.

“ini” files contain “sections” which contain keywords, but those keywords may be repeated in several sections, providing completely independent functions. For example, if you grep the keyword “admin_password” in a nova.conf file you will get at least 3 matches, in the sections “keystone_authtoken”, “neutron” and “ironic”.

Continue reading

Setting up a CentOS 7 PXE server

PXE (or Pixie) boot is a very convenient way to start machines by providing custom operative systems trough the network.

Furthermore, in this post I will also explain how to set up a kickstarter file to perform a fully unatended CentOS 7 installation.

The idea is very simple: a machine with PXE boot enabled will boot up and search for a PXE enabled DHCP server on it’s network, and when found, it will request an IP and network configuration. Together with this network configuration, it will receive some booting instructions including the “iso” file of the operative system which is going to boot.

Continue reading

From Molecular Modeling to IT and cloud computing

It’s been already more than a year since I haven’t posted anything here, and the reason for that is, that I switched fields.
Since May 2014 I have been working for the DKRZ, the German Climate Computing Centre, on field cloud computing.

This means, that as I most likely won’t be facing so many molecular modeling challenges anymore, my tips and tricks are going to focus mostly on IT and Cloud Computing stuff from now on.

As in he case of Molecular Modeling, and quantum chemistry/physics in general, the IT field has a lot of tricky tools and concepts which are not so easy to understand. But as in the case of quantum chemistry, once I understand the ideas, I find out that they can be roughly explained in a very simple way… Continue reading

now for HLRN III

This is a new version of my now python script for monitoring the HLRN III.
I am usually on the Hannover partition, but it should work perfectly in Berlin too.

In this version, I keep all the features of the cluster version except the “gossip” section for checking on who is calculating what and how many resources are they using, since a supercomputer has too many users and we would need a terminal of a couple of square meters.

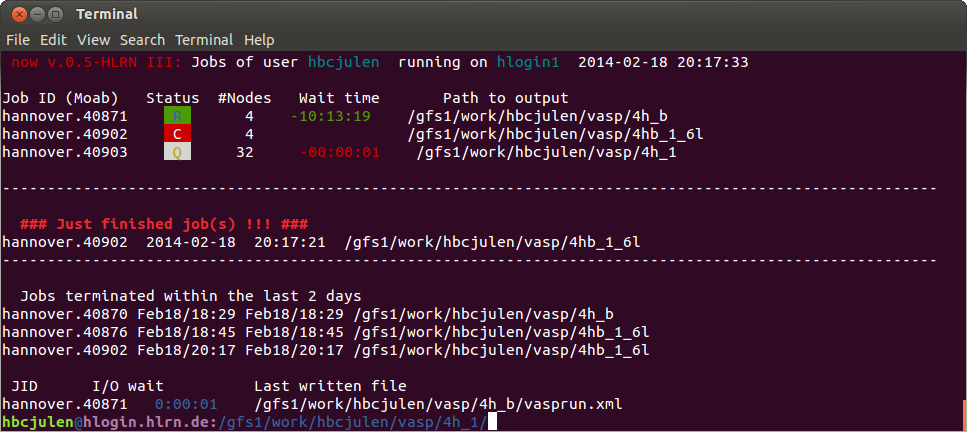
Screenshot of now HLRN III

now version 0.5 specially modified for working on HLRN III supercomputer in Hannover and Berlin.

Continue reading

IR and Raman spectra calculated with Quantum Espresso

Infrared (IR) and Raman spectra are two very valuable tools for the characterization of chemical compounds. And although there seem to be many different possibilities to produce them computationally, I didn’t find any clear tutorial on how to produce them using free software tools. Some of them, give complicated instructions on how to calculate second derivatives or Raman tensors, or stuff like that, but in the end one wonders: Where are the numbers I have to plot!

…Thereby, here is my post about computing IR and Raman spectra with Quantum Espresso.

For the impatient: most of this post is resumed in my Quantum Espresso example for the PHonon code, which will run for some 15-17 minutes and pop-up the IR/Raman spectra of CO2 and ZnO (Wurtzite).

Continue reading

cube2xyz: convert cube data to xyz and slize segments/planes

In this post, I introduce my new cube2xyz script for converting cube data into “x,y,z,value” format and optionally creating nice 2D or 3D plots displaying the value of the cube property along a segment or a surface.

.cube files are originally from the Gaussian molecular modeling code, but nowadays can be produced and read by most of the computational chemistry programs. They consist of a lot of blocks of data describing the values of a measured property (charge, spin polarization, electronic density, …) on each point of the space inside the simulation cell.

Continue reading

My code hosted on GitHub

I have been putting my scripts in a directory on my own server, and it is starting to get a little bit messy. Therefore, I have created 2 repositories on GitHub in order to keep explanations and code separated and develop new versions in a more structured way.
The address to my GitHub repositories is https://github.com/julenl.
From now on, I will upload most of the scripts I already introduced here and add the new ones (or new versions of the existing ones) directly there, and use the website only for giving a description and a usage explanation of them.